How to Clean Metal Railings: The Step-by-Step Guide
If you want to keep your outdoor areas looking shiny and new all through the year, you might be wondering
Products in Stock
Lowest Prices
Express Delivery
10-Year Warranty
May Sale. Up To 15% Off.
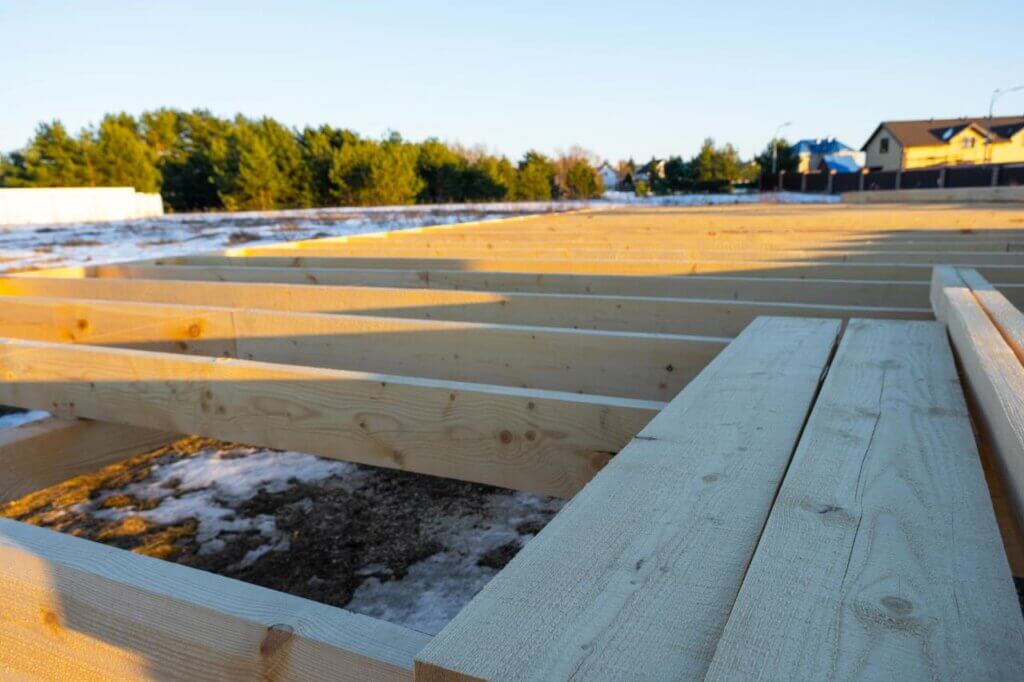
Decking frame spacing determines whether you have a solid deck or a wobbly deck. In all the excitement of receiving your new composite decking, installation sometimes goes wrong, leading to a deck that is unstable and unsafe.
Decking frame spacing is crucial if you want a deck that functions and stands the test of time. But, how do you install it properly? Don’t worry, it’s not as complicated as it sounds, as we’ll demonstrate in this guide.
Decking frame spacing is all about how far apart you place the joists – those horizontal beams that support your decking boards. Think of them as the ribs of your deck; the space between these joists can vary, but getting it right is key to creating a deck that’s not just beautiful, but also safe and long-lasting.
When you’re planning your deck, you might be tempted to focus on the visible stuff – the colour of the decking boards, the balustrade railing design, or where you’ll put your BBQ. But trust us, paying attention to the decking joist spacing is just as important; it’s what gives your deck its strength and ensures it can handle everything from summer parties to winter snow loads.
Imagine trying to walk on a deck where the boards are sagging between the joists. Not exactly the relaxing outdoor experience you’re after, right? Proper joist spacing prevents this by evenly distributing the weight across your deck, so whether it’s you and your friends enjoying a beer, or a heavy snow load in winter, correct spacing ensures your deck can handle the extra weight.
As experts in decking and all things outdoor, we’ve seen firsthand how high quality composite decking can transform an outdoor space. But even the best decking materials need the right support underneath, and that’s where smart joist spacing comes in, giving your deck the backbone it needs to stay strong for years to come.
Nobody wants a deck that feels like it might give way at any moment. Correct joist spacing is a major player in keeping your deck safe. It prevents boards from flexing too much, which not only feels more secure underfoot but also reduces the risk of trips and falls. Plus, if you’re running a commercial space, it helps your deck meet planning permission regulations and council building codes, giving you peace of mind that your outdoor space is up to scratch.
Now, you might be wondering, “How far apart should these joists actually be?” The answer can vary depending on a few factors, but we’ve got some general guidelines to get you started.
For most residential decks, you’re looking at a joist spacing of around 40 cm or 16 inches on centre; this means measuring 16 inches from the centre of one joist to the centre of the next.
However, don’t take this as a one-size-fits-all solution; sometimes, joist spacing depends on the decking boards used. At Dino Decking, all our composite boards require 300mm (30cm) or less spacing – anything more than this and they wouldn’t be covered under warranty.

Getting your joist spacing right doesn’t have to be a headache. With a bit of planning and the right tools, you can nail it.
Sketch out your deck and decide on your joist direction. Additionally, check the frame components for any damage before installing as wobbly decks can sometimes be caused by damaged parts, not incorrect installation.
Use a measuring tape and pencil to mark where each joist will go on your beam or ledger board. This ensures accurate spacing that will ultimately keep your deck stable and safe.
The best rule to follow when cutting your joists is to measure twice, cut once. This ensures accuracy and means that you don’t waste any of your deck frame components by cutting them incorrectly. When cutting your joists, always make sure you are wearing safety glasses and other PPE equipment.

Joist hangers are metal brackets that will secure your joists to the beam or ledger board. These are important for ensuring the joists stay in place for years to come.
Set each joist into its hanger, ensuring that it’s level and square. Use a spirit level for extra accuracy at this stage.
Nail or screw the joists into place according to your local building codes.
After installing the decking frame, ensure they are straight by running a string line across them. This will expose any areas that are slightly raised or too low, making it easier to identify and fix issues.
Remember, if you’re feeling a bit out of your depth, there’s no shame in calling in the pros. Sometimes, getting expert help can save you time, stress, and potential headaches down the line.
Before you even pick up a hammer, spend some time planning your deck layout. Consider factors like the direction of your decking boards, any features you want to incorporate, and how these might affect your joist spacing. You could incorporate some of our decking planter ideas or go for some specialist deck seating to make your deck a social space.
If you’re looking for a comprehensive approach, our complete guide to decking installation can be a real lifesaver. It covers everything from planning to finishing touches, ensuring you don’t miss a beat in your deck-building journey.
While a tape measure and pencil can get the job done, there are some nifty tools out there that can make spacing your joists a breeze. Joist spacing gauges, for instance, can help you mark out consistent intervals quickly and accurately.
Don’t forget about digital tools, either; you can find some great apps and online calculators that can help you determine the optimal spacing for your specific deck design and materials.
Ultimately, getting your decking frame spacing right might seem like a small detail, but it can make a huge difference to the longevity and enjoyment of your deck. By taking the time to understand and implement proper joist spacing, you’re setting yourself up for years of worry-free outdoor living.
Why not get some high-quality, durable composite decking to kickstart your garden project? At Dino Decking, we stock a range of composite decking colours as well as all the parts you need to start building your decking frame.
Get in touch today or order a FREE sample pack to get started.

Our sample pack contains a sample piece of each colour currently available. Order your free sample pack today to compare the colours and get a true feeling of the Dino Decking range!
If you want to keep your outdoor areas looking shiny and new all through the year, you might be wondering
Having a deck can be great for entertaining or relaxing in the summer months. Composite decking has a lot of